Creating a Web Application (Virtual Directory) in IIS 7
One of the first things that you will need to do is to create a web application (for more
information, see the section on
web applications and pools).
Before you start
A note about security
It is highly recommended that any IIS configuration should only be performed by
company staff / persons who have experienced administration skills with MS
Windows Windows Administration. IIS is a complex enterprise system that has many
settings that may indirectly affect the operation of the
HelpMaster Web Module. Furthermore, the
configuration of any internet based IIS application has serious network
security issues that need to be understood and correctly implemented.
An
incorrect configuration of a web server may expose your network and data to
hackers or other malicious activity.
A note about pre-requisite installations
At this stage, it is assumed that you already have installed both Microsoft IIS,
the
Microsoft .NET Framework and the HelpMaster Web Module.
Location Options
The
HelpMaster Web Module
needs to be installed as a web application under the
Default
Web Site or a new Web Site with a different binding and/or Host name to the
Default Web Site. Installing the
HelpMaster Web Module
as the
Default Web Site
is only recommended when a dedicated domain is being used, e.g.
http://helpmaster.mydomain.com.
When this configuration is used a duplicate web Application needs to
reside under the Web Site pointing to the same physical path or the
application will not appear in the HelpMaster Web Configuration Manager. In the majority of cases the
HelpMaster
Web Module
should be installed as an IIS
Virtual
Directory
e.g. http://mydomain.com/helpmaster/.
Creating a new virtual directory / application
-
Open the IIS Manager by selecting Control Panel > Administrative
Tools > Internet Information Services (IIS) Manager
- "Right click" on the
Default Web Site
node/branch and select Add application... from the pop-up menu
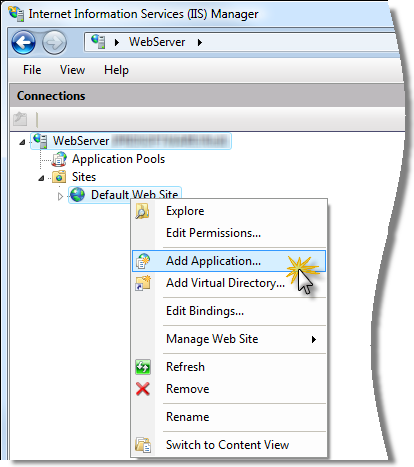
The properties for a new application will be displayed.
- The "Add Application" screen contains several settings that need
to be configured. After each of the settings below have been
configured, click OK to create the web application.
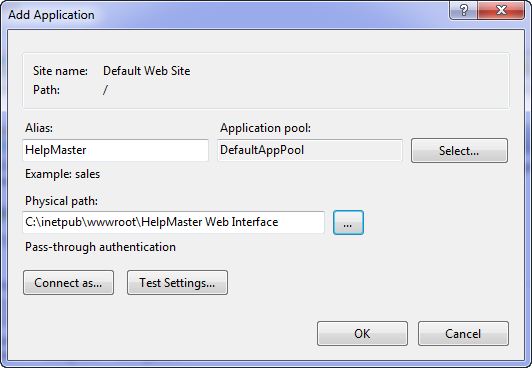
Alias : This is the name of your HelpMaster
web application. This should be one word without any spaces. This name will be the web
page that you will need to access to use the HelpMaster Module.
eg.
www.machinename.com/virtualdirectoryalias
Application pool : Select the application pool that the
HelpMaster web interface will operate in. Choose the
Classic.Net AppPool or select / create another Classic application pool. For further
information about Application pools, refer to Web applications and pools.
Physical path : Click the "..." button to browse to where
you installed HelpMaster. It is vital that you select the
"web_structure" folder. If you selected default settings
during the setup, this location may be "C:/inetpub/wwwroot/HelpMaster
Web Interface" or similar.
Note: If you moved this folder at any time, or wish to re-locate this folder,
please read this first.
Connect as... : Select the connection method.
The default setting is "Application user (pass-through
authentication)"
See also
Creating a Virtual Directory for Windows Integrated Authentication for
IIS 7