For the HelpMaster Web Interface to run correctly, it needs to be configured as an application in IIS. This step is required regardless of which version of IIS you are using. By specifying the Web Interface virtual directory is an application, it allows it to take advantage of the underlying components required - such as the .NET framework. If you have not specified your virtual directory is an application you will likely get an error such as the following error.
To check to see whether your Web Interface virtual directory is an application, open the first page of the properties for the virtual directory. In the lower half of the page (on the 'Virtual Directory' tab if using IIS 5.x or 6) you will see the section 'Application Settings'. There will either be an application name with a button 'Remove' next to it (this means there is an application), or there box with a name will be greyed out and there will be a create button (this means it is not an application). In such a case, to turn virtual directory into an application, click the 'Create' button.
You may also be able to tell by looking at the icon in the tree. If you see a little box with items inside it (IIS 5.x), or a little cog (IIS6), or a globe with two pages overlaid (IIS7) it is an application. If it has just a picture of a folder with a globe (IIS5.x, IIS6) or an folder shortcut icon (IIS7) it is only a virtual directory. (For additional assistance, see the page on determining your IIS version.

Web applications were somewhat more simple to work with in IIS 5.x (of course, with simplicity comes limited flexibility). When you created an application, you had three choices about how you wished to run the application process.
We strongly encourage you to run the HelpMaster Web Interface under 'High' protection.
From IIS 6 onwards application protection - in it's former state - has been done away with, making way for a more flexible, powerful model. This has been accomplished through the creation of application pools. You will find the 'Application Pools' container at the same level as the 'Web Sites' container in the IIS hierarchy.
What is their purpose? Application pools are logical groupings of web applications that will execute in a common process - thereby allowing greater granularity of which programs are grouped together in a single process. For instance, if you wanted every web application to execute in a separate process, you simply create an an application pool for each application.
To assign a web application to an application pool, you simply select the application pool name from the drop down box on the web application properties page (in IIS 6, on the virtual directory tab). This takes the place of what used to be the 'Application protection' dialog box.
In addition to providing more granular control of which applications run in which processes, you are given a host of other options which allow for the customising of the process behaviour (memory allocation, fail protection, identity, etc) which are beyond the scope of this document.
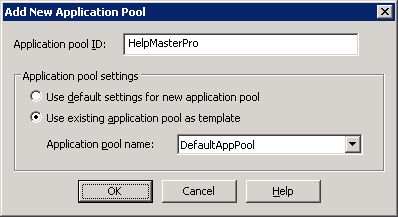
To use Application pools to run HelpMaster in its own process, open up the application pools folder in IIS hierarchy. Right click on the folder and select 'New --> Application Pool', enter a name (eg. 'HMP Web Pool') and opt to copy the settings from the 'DefaultAppPool'. To set the application pool for the web application, open up the properties page for the HelpMaster Web Application in IIS and select your application pool down the bottom of the 'Virtual Directory' tab (located in a similar position to where the 'Application protection' setting existed in IIS 5.x.

For further considerations when installing the HelpMaster Web Interface on IIS 6, please see the IIS 6 considerations page.
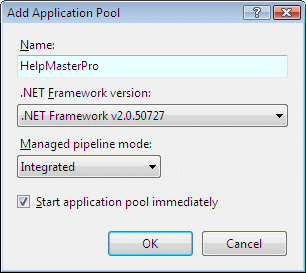
Creating an application pool in IIS7 is a similar process. Right click on the 'Application Pools' section, then select 'Add application pool...'. You will be presented with a dialog box to select your ASP.NET version. Make sure you select 2.0.x (as opposed to other version you might have installed). You can also elect to use either the classic or integrated pipeline mode. Integrated pipeline mode offers your web application some performance enhancements, but discussion of these is beyond the scope of this article. For more information on how to take advantage of this new framework, please see page on using integrated pipeline mode
 .
.
To set the application pool for the web application, right click on the web application and select 'Advance Settings', then under 'Behaviour' select the application pool from the drop down list.
Additional information relating to running the HelpMaster Web Interface on IIS 7 can be found in the IIS 7 considerations page.
See also